Showing posts with label Basic SharePoint. Show all posts

Thursday, 29 October 2015

Claim based Authentication Tutorial Part 4

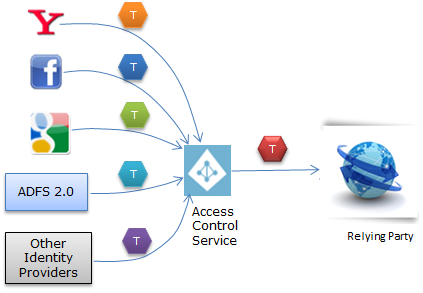
In federated scenario, two Identity Providers comes into the picture : one is Identity Provider (where user puts its credentials) and another is Federated Provider which understands all the Identity Providers and accordingly creates a new token that is understood by the relying party. Relying party does not care about Identity Providers, rather it just trust the Federated Provider and can understand the token issued by it. It can be pictorially depicted as
FullImage
As here in above image, we can see that every Identity Provider send different type of token. Access control service process these and create a new token and sends to Relying Party.
We can have our own custom Identity Provider and Federated provider as well.  In Microsoft stack, Access Control Service is one of the most popular service which serves the purpose of a federated provider. It is Pay-As-You-Go service on Azure and provides all the basic infrastructure and requires less or no amount of coding. Access Control Service is now called Windows Azure Active Directory.
In today’s post, I’ll create a step by step example to implement the Federated provider using Windows Azure Active Directory. First let me discuss the various components while using federated provider . So there would be at least  four components
  1. Client
  2. Identity Provider(s)
  3. Federated Provider
  4. Relying Party
As we have already discussed all the above components in my last post. we ‘ll create a step by step example of Federated Provider. Here Identity provider could be any third party Identity Provider or our own Identity Provider. Windows Azure Active Directory works as Federated Provider and a application hosted on my local machine will be relying party.
Let’s go step by step. First we need to create a namespace at azure Access control. For this first one need to be registered on http://windows.azure.com. If you have account here then you can continue else you’ll require to register here before proceed.
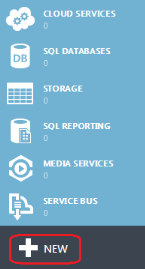
Here we’ll login azure portal (https://windows.azure.com/) and create a Active Directory Access Control namespacefor our Federated Provider that will be used by our application (Relying Party). After login it redirects to home page and provides many options in left pane of the Home page as
OneNew
Here to quickly create the Active Directory Access Control namespace click on the encircled new button in left bottom as in above screen shot. It opens up a window.
Select App Service ->Access Control -> Quick Create. It asks for namespace and region. The namespace should be globally unique, else it will not be accepted. After filling it click on Create
four
I have given here namespace CBAPart4 and selected region Southeast Asia. Here you can see encircled green tick mark which means the namespace available. After creating, it will be enlisted in your account with status active few minutes as:
five
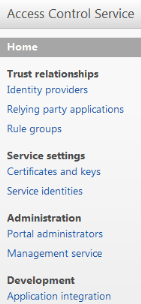
On this page, click on Manage button at bottom middle of the page which takes us at different page in a new tab/window with left pane as
six
Now click on Identity Providers which allows to add Identity providers for this Federated Provider. It takes us at below screen
seven
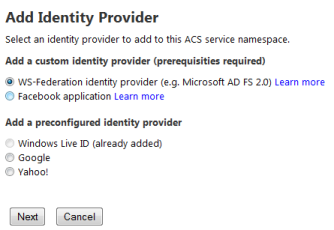
It has added by default added Windows Live Id as an Identity Provider. We can add other providers by click on Add link encircled in the above screen shot.
eight
Here we have some already pre-configured Identity Providers like Google, Yahoo and custom Identity Providers like facebook, ADFS 2.0 (Active Directory Federation Services).  Let’s add Google here
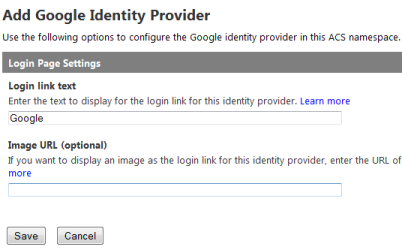
nine
It asks the that display and any image for that if we want to show that at login link. I provided an image and Clicked on save. Similarly we can add Yahoo as an Identity provider. Now we have three Identity providers for our federation provider: Google, Yahoo and Windows Live Id.
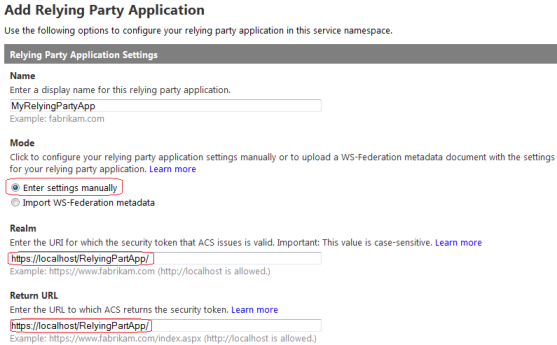
Next we require to add the Relying Party. Means our application that will be authenticated via this Federated Provider. To add the Relying Party applications, click on Relying Party applications link, it takes us
AddRP1
Here I provided the name to my Application as MyRelyingPartyApp . There are two ways to add settings. Select the first one (Enter settings manually) as encircled in mode section. We need to provide two URLs. Here one is for which the token is issued (also called Realm) and another where the federation provider returns the access token. Leave the rest of the settings of section Relying Party Application Settings section and move to next sectionAuthentication settings on the same page as
AddRP_2
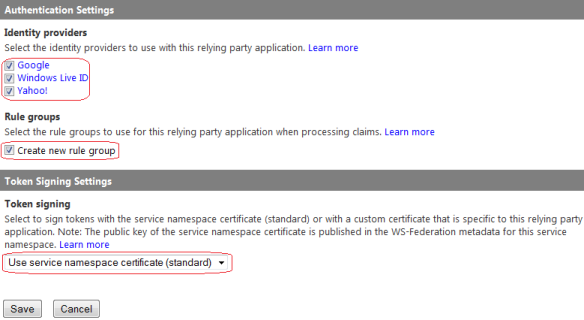
Here it lists all the Identity Providers that we added , we need to select all which we want to use. I selected all. Now we need to create the rules. So first require to create a Rule Group then rules under that rule group.  We either can use any existing rule group (if exists which can serve the purpose) or can create a new one. I’ll be telling why do we require the rules in coming section.
Token is required to be signed to check the integrity at the target application. Here I have selected the default option for this demo. We can provide our own certificate that can be used for token signing.
Rule – Rules are very important here. Identity Providers sends token with claims to Federated Provider. As Federated provider trust Identity Provider so it knows the format and details about token and can read it. Federated provider first checks the integrity of token then read the required data and creates a new token with claims. Then Federated provider sends this token to Relying party. Here this rule is to convert the claim provided by Federated Provider to some other claim type that can be understood by Relying party.  We can easily pass through the same just creating a rule with pass through.
Rules also are very helpful because we not want to sends all the claims to Relying party or want to combine some claims. These scenarios is handled by these rules.
To add the rules, click on the Rule Groups from left pane
RuleGroup1
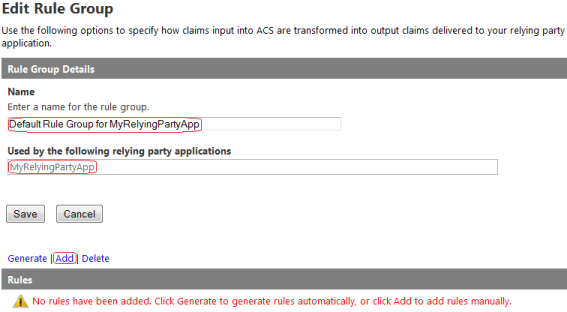
It adds  by default a rule group for added Relying party. We can create new one . We need to add the rules in the rule group assigned to Relying party. For that click on Default rule group on the above screen shot and it redirects us to
RuleGroup2
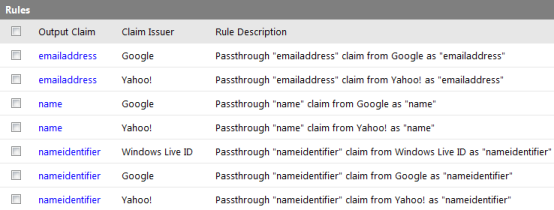
Here we can see the details of the rule group. It is for the Relying party that we added as second encircled . Now in this group there is no rule. Either we can add some rules or we can simply check on Generate button, which redirects us a page which list down all the Identity Providers for this Federated Provider namespace and again click on generate button which just add the default claim rules that just pass the claims returned by Federated Provider as is. A rule is created is for each claim which has input claim and output claim as
Claims
Else we can create rule by our self by clicking on the Add link as encircled in the previous screenshot as:
AddClaimNew
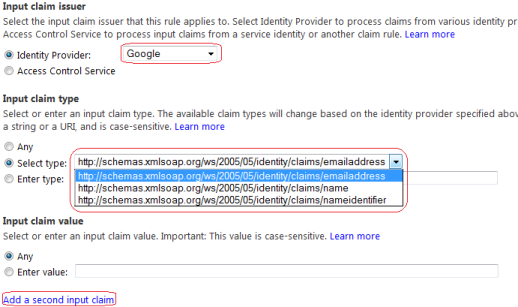
It has three section, first section If  first option Identity provider, once we select it accordingly it populates all the claims provided. As I selected Google and enlist all the claims by provided by Google in dropdown as marked in second encircled area.  We can add here another input claim as last encircled link. Now let’s move to next section that is Then
AddClaim2
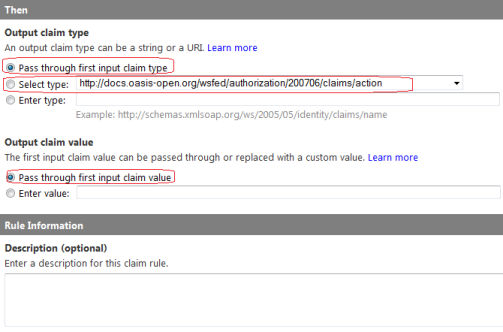
Here either we can pass through as it is or we can send it in some another type that is available in second encircled drop-down. It has a list of standard claims that we can choose off. Also we can put our own custom claim type in the text box. Every claim type is in URI format as per standard so custom type also should follow the standard. I have selected pass through. The last section is Rule Information . here we can put the details about the rules.
All the required steps has been completed on windows azure portal, Now need to get the metadata for the Federated provider. Click on the Application Integration link under the Development section in left pane.
AppIntegration
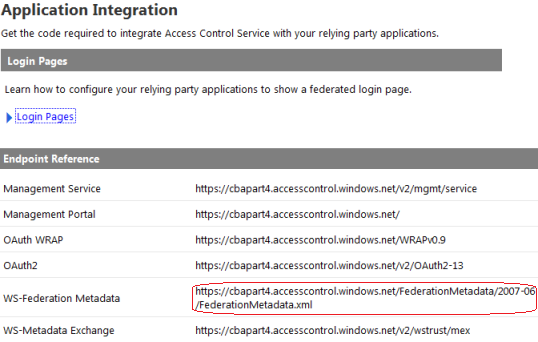
As this provides many option but we require here WS federation metadata as encircled that will be used in relying party . Copy that encircled URI.
As discussed, I have created a ASP.NET web application project using default template and hosted at IIS. Now the next step to build a trust relationship with Relying party and Federated Provider. So as we have already seen in our part 2 post that how to build relationship between Identity Provider and relying party. We require here the federation metadata from the identity provider and add the STS (Securty Token Service) reference. I am adding those steps for the completeness of the post.
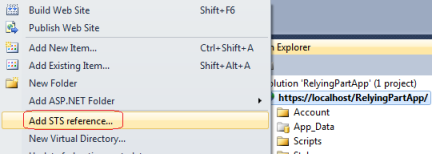
So let us add the STS reference as
AddSTSReference1
It opens a popup as
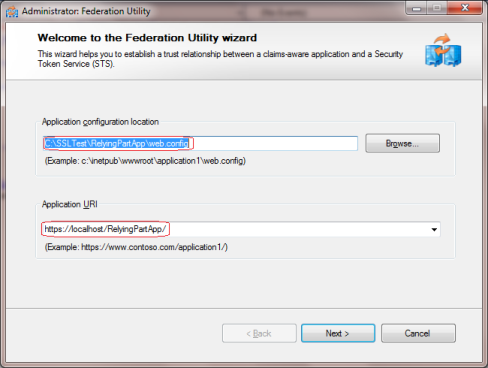
addsts2
First encircled area contains Relying party configuration settings and another is Application URI. Click on next
AddSTS3
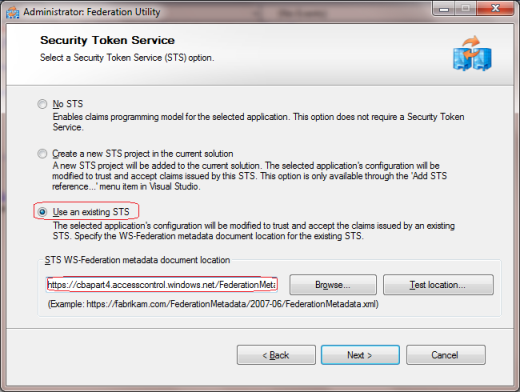
Here as we are using existing STS so selected the last one. We require to provide the metadata here so to get the metadata URL from Federated Provider. I have the provided the metadata URI that we copied from Application Integration section. Click on next
AddSTS4
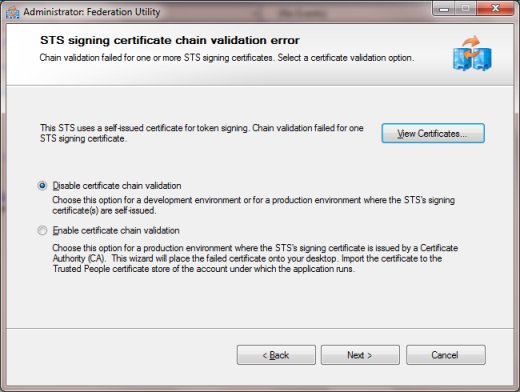
Here I have selected to Disable certificate chain validation as my certificate is not verified. For development purpose it can be disabled but at production, this option should not be selected.  Click Next
addsts5
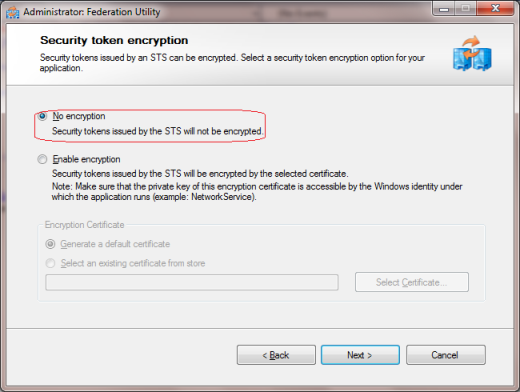
Select No Encryption. Click Next.
AddSTS7
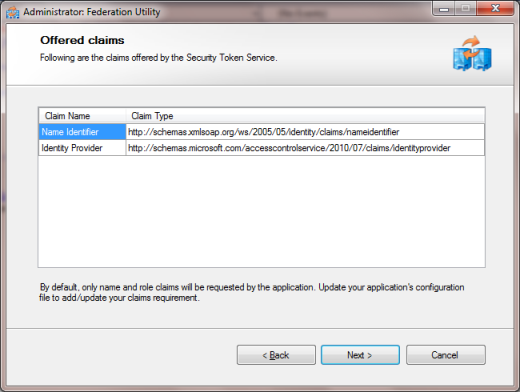
Here we have two claims Name and Identity Provider. Click Next
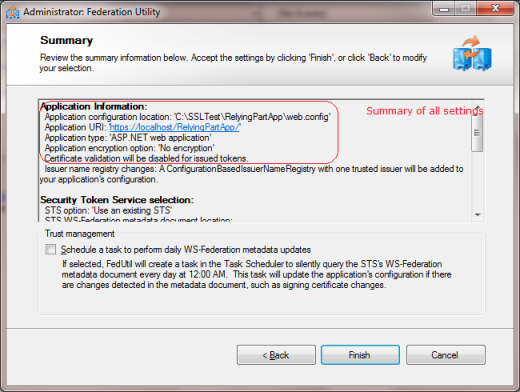
AddSTS8
Now click finish. And we have built a trust relationship between federated provider and our own Application (Relying Party).
Now it’s time to run the application. So let us run it
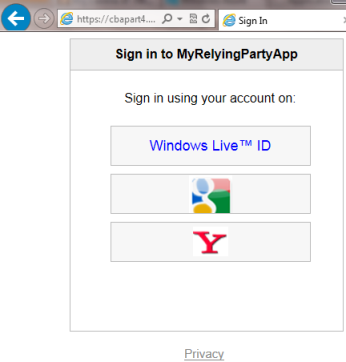
RunRP1
It takes us a page and asks us to choose the Identity Providers that we added as Identity Provider while configuring Federated Provider on Azure Portal. The images for Identity Providers, I provided while adding these on Azure Portal.
Now I clicked on Google and it took me at Google login page after providing my credentials and successful authentication, I got redirected my own application as an authenticated user. Similarly can get authenticated via Windows Live Id or Yahoo Id.
Reading Claims provided by Identity Providers
Reading the claims is very easily that are provided by these Identity Providers. I read the claims and displayed it via a Data Control. To read the claims, we can use the following code
IDictionary<string, string> claims = new Dictionary<string, string>();
// Cast the Thread.CurrentPrincipal
IClaimsPrincipal icp = Thread.CurrentPrincipal as IClaimsPrincipal;
// Access IClaimsIdentity which contains claims
IClaimsIdentity claimsIdentity = (IClaimsIdentity)icp.Identity;
gdViewClaims.DataSource = claimsIdentity.Claims;
gdViewClaims.DataBind();
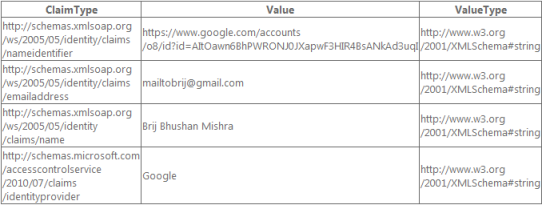
Now If I login through Google account then it shows the following claims
GoogleClaims
I have displayed three values here ClaimTypeValue, and ValueType.  Here Google returned four Claims which has it’s descriptions and my mail-id and name. Similarly if I login through another Identity Providers, they will show different claims. We can use these values in our relying party for different purposes.
Claim based Authentication Tutorial Part 3

In our last example we discussed the simple approach to use Custom Identity Provider for Authentication. But things are not as simple as we discussed. Now as we externalize the Authentication system and use Identity Provider to authenticate a user. There are situations one might require to use several Identity Providers like facebook, google, windows live id etc. It’ll look like something this
Let’s say, I made an application and I want users are allowed to give options to choose the Identity Providers. It can be implemented making a trust relationship between the RP and multiple Identity providers. Then the flow diagram would be like
But as in open world, Identity Providers using different protocols and some has developed their own proprietary protocol, so your RP must understand all these protocols. So your application understands all these protocols and can verify and read the token. For this, we need to write the extra codes to handle all these various protocols. Now the scenario would be like this
This is not a good solution. And what if you want to add one more Identity Provider to your Relying Party. Means you need to change the code for your application to accommodate the new identity provider. So this is not good approach because every time, you need to change the RP code every time.
Now lets take another scenario, In your organization there are several applications available to users and these application trusts several Identity Providers. Now you need to write the plumbing code in every application to handle all these Identity providers.
One more scenario, If user uses an Identity provider that does not trusted by the application. But if there is an one Identity provider trust some another identity provider that in turns trusted by the application. This is Called Identity federation.
All these above scenario can be easily handled by Identity federation. i e you can have an Identity provider (known as federated Provider), that actually receives (trusts) first the tokens from all the various Identity Providers and then issue a generic token that actually can be understood by the Application. i e the application only trusts the federated provider.Allthe plumbing code to understand various Identity Providers has been moved to federated provider.
This makes the life very easy
Now you can see all the above problems can be easily handled. So Now let’s discuss how the process flows.
Step 1: User access the Relying Party Application.
Step 2: As user is not authenticated, Relying Party application forwards the user to its trusted Identity provider ( here Federated Provider to get Authenticated)
Step 3: Now the federated provider, itself is not an Identity Provider, It relies on several other Identity Providers. So it gives list of Identity Providers to the user to get Authenticated.
Step 4:Now user gets a list trusted Identity Provider and it selects an Identity provider (where it has an account) and authenticate it self. Once authenticated a Token is issued for the User by the selected Identity provider and passed to the Federated Provider.
Step 5:Now as Federation provider trusts the Identity provider, it can understand the token. It firs verifies the token and decrypt it if required. It verifies and read the incoming token And issue a New token and transforms the Claims from Identity provider token using Claim rules (if any) to new token.
Step 6: The new Token (issued by FP) is passed to Application (Relying Party).
Step 7:And this token is forwarded to Relying Party. As relying party trusts the federated provider It can understand the token and verifies it and once verification gets successful. It allows the access to application.
So the above process takes place behind the scene and user does not need to care about it. user just need to select one of the listed Identity providers, select and put the credentials to authenticate. All rest process takes place behind thescene.The whole process also termed as Single Sign On.
So form the above flow, we understand that , Not only one relying party trust the Identity provider and an Identity Provider can trust another Identity provider as well.
Also in the above scenario, Two Identity providers come into the Picture. First provider sends the token to other provider with Claims. Now the second provider has an option to transform like removing a Claim, and a new Claim, changing the two or more claims into one, splitting one claim into two or more etc.. This can be done based on te requirement. These type the things can take place in federated provider Windows Azure Access Control Service works on the same model. In that ACS plays the role the Federated Provider and there we specify some pre-specified Identity Providers like facebook, google, adfs etc.

Claim based Authentication Tutorial Part 2

What is Windows Identity Foundation(WIF):

First of all. I’ll say Windows Identity Foundation is a   Microsoft way to leverage the Claim based Authentication. Lets see the definition from msdn,
Windows Identity Foundation enables .NET developers to externalize identity logic from their application, improving developer productivity, enhancing application security, and enabling interoperability. Enjoy greater productivity, applying thesame tools and programming model to build on-premises software as well as cloud services. Create more secure applications by reducing custom implementations and using a single simplified identity model based on claims. Enjoy greater flexibility in application deployment through interoperability based on industry standard protocols, allowing applications and identity infrastructure services to communicate via claims.
So we can say, Windows Identity foundation provides a set of classes which facilitates in implementing Claim based authentication.

Prerquisite:

To use WIF you need Windows 2003 server+ or Windows 7/8/Vista.
  • WIF for Win server 2003 download it from
    here
  • WIF for Win 7+ download it from
    here
  • WIF SDK download it from
    here
WIF SDK provides some visual studio template that helps in developing Claim
aware applications. These templates are
  • ASP.NET Security Token Service Web Site
  • Claims-aware ASP.NET Web Site
  • Claims-aware WCF Service
  • WCF Security Token Service
Above templates are available in New Website under File Menu.

Let’s discuss an Example

So today we will create an asp.net application(Relying Party Application-RP). And also
we’ll create a custom
Identity provider and we’ll use this identity provider for authentication of the user.
These are following main steps need to perform.
  • Create a Custom Identity Provider
  • Create an ASP.NET application
  • Create a trust between Identity provider and ASP.NET application
So lets first create an Identity Provider
Creating a Custom Identity Provider
So here I will create a step by step process to create a Custom Identity Provider.
– Open Visual studio-> Create new website ->select ASP.NET Security Token Service Web Site (I have selected the location HTTP
to host it at IIS directly)
Now your sample Identity provider is created. It provides the basic infrastructure for you. It includes one login page that actually authenticates the user and here forms authentication is used.
Create an ASP.NET application( Relying Party – RP):
I have created an ASP.NET application as below.
Now as this already create a inbuilt authentication module. You can remove it at all because we’ll not be using this. Or you can create an empty asp.net solution and some page as per needed. I have removed the account folder for the demo.
Create a trust between Identity provider and ASP.NET application(RP): This can be done using FedUtil provided by WIF SDK. Also from UI, we can add an STS reference in the ASP.NET website and make a trust relationship between Identity Provider and Relying Party. Look the following steps to add the reference
  • Add a STS Reference to ASP.NET website
  • This is First screen of FedUtil which displays the URI and location of ASP.NET website(RP)
  • If you have not hosted your ASP.NET website(RP) on SSL it will the following Warning. At Production all the communication between Identity Provider and ASP.NET website(RP) should happen over SSL only. Here for demo purpose, I didn’t use SSL. I clicked on Yes.
  • In this screen, It asks to select the STS ( Security Token Service). And has three option. As we have created the STS, we need to select the option “Use an existing STS”
To build the trust relationship, we need to provide the federation metadata provided Identity Provider.
  • Now we need to browse the FederationMetada xml file of the STS that we created.

FederationMetadata file resides in a special folder hierarchy “FederationMetadata/2007-06” under the STSWebsite physical folder.
  • And Select the FederationMetdata. And Click next
  • Again as my Security Token Service(STS) is not hosted at SSL. So it is showing the below warning
    message. I just clicked Yes
  • Here it asks if one wants to encrypt the token. It should be encrypted on production.You require to provide a certificate for the encryption. Here I have selected the option “No Encryption” for the demo.
  • Now it shows all the claims passed by STS to RP. We can pass more claims from STS to RP as per our requirement. All the Claims is shown here while adding the STS reference at end. By default there are only two roles provided by STS (Name & Role)
  • This is the Summary screen, shows the details about STS and RP. One need to review and click finish.
Note: Here There is an option for to update the federation metadata on a routine basis. One need to know, if the STS is getting changes say Token or Claims etc. RP would only come to know about when federationmetadata will be updated, else say if someone removed a Claim and metadata is not updated it will allow to get the that Claim but actually at runtime you would nto get that claim which will not be a good condition.One should always have the metadata in updated form.
After clicking Finish. A folder FederationMetadata is added to ASP.NET website (Relying Party -RP) as below


Lets run the application:
Now if you run the application. It will throw an exception as
“Unable to evaluate expression because the code is optimized or a native frame is on top of the call stack.”
This is an issue with it and I have made a small post on it. You can get it resolved easily. Please check this
Now after changes it will run smoothly and It will take you at login page that is provided by STS. This is default login page provided STS, here you dont need to write password just put some name and click on login as below.
It will redirect to another page to STS which will actually initiate the process to create the token and claims. Then after creating it will be transferred to your website as authenticated user.
Now our application is running. As here in STS we have a sample login page the uses Forms authentication and by default authenticate every user. Here we can put our code, whether if we want to authenticate the user using windows authentication/Form authentication and use database this all we can and also we can get some data of the user from any store say DB here and that we can send using in Claims as per our requirement.
So Now here I’ll show, how to pass some more information to the user in Claims. So one can additional claims here. When you create a STS, there are four files get added in App_Code folder. One file named CustomSecurityTokenService.cs. In this file there is a method GetOutputClaimsIdentity actually creates the claims. We need to add the claims here ( I have added few)
1
2
3
4
5
6
7
8
9
10
11
12
13
14
15
16
17
18
19
20
21
22
23
24
25
26
27
28
29
30
             ///
<summary> /// This method returns the claims to be issued in the token.
 /// </summary>
    ///The caller's principal.
    ///The incoming RST, can be used to obtain addtional information.
    ///The scope information corresponding to this request.
    /// If 'principal' parameter is null.
    /// The outgoing claimsIdentity to be included in the issued token.
    protected override IClaimsIdentity GetOutputClaimsIdentity( IClaimsPrincipal principal, RequestSecurityToken request, Scope scope )
    {
        if ( null == principal )
        {
            throw new ArgumentNullException( "principal" );
        }
        IClaimsIdentity claimsIdentity = (IClaimsIdentity)principal.Identities[0];
 
        ClaimsIdentity outputIdentity = new ClaimsIdentity();
 
        // Issue custom claims.
        // Update the application's configuration file too to reflect new claims requirement.
 
        outputIdentity.Claims.Add( new Claim( System.IdentityModel.Claims.ClaimTypes.Name, principal.Identity.Name ) );
 
        outputIdentity.Claims.Add(new Claim(ClaimTypes.Role, "Manager"));
        //I added these custom claims
        outputIdentity.Claims.Add(new Claim(ClaimTypes.Email, "brij@gmail.com"));
        outputIdentity.Claims.Add(new Claim(ClaimTypes.Gender, "Male"));
 
        return outputIdentity;
    }
I have added two claims (Email, Gender )as above. These Claims will be available at ASP.NET website( Relying Party).
The same Identity provider can be used in multiple application.

Reading Claims at Relying Party(RP):
It’s easy to read the claims at Relying Party. To read the claims you need ClaimsIdentity of the logged in user and it is available in User Property. I have read the Claims at my page. I have created a dynamic table and shown the claim in that.
1
2
3
4
5
6
7
8
9
10
11
12
13
14
15
16
17
18
19
20
21
22
23
24
25
26
27
28
29
30
31
32
33
34
35
36
37
38
  IClaimsPrincipal claimsPrincipal = Page.User as IClaimsPrincipal;
IClaimsIdentity claimsIdentity = (IClaimsIdentity)claimsPrincipal.Identity;
 
// The code below shows claims found in the IClaimsIdentity.
 
Table claimsTable = new Table();
TableRow headerRow = new TableRow();
 
TableCell claimTypeCell = new TableCell();
claimTypeCell.Text = "Claim Type";
claimTypeCell.BorderStyle = BorderStyle.Solid;
 
TableCell claimValueCell = new TableCell();
claimValueCell.Text = "Claim Value";
claimValueCell.BorderStyle = BorderStyle.Solid;
 
headerRow.Cells.Add(claimTypeCell);
headerRow.Cells.Add(claimValueCell);
claimsTable.Rows.Add(headerRow);
 
TableRow newRow;
TableCell newClaimTypeCell, newClaimValueCell;
foreach (Claim claim in claimsIdentity.Claims)
{
    newRow = new TableRow();
    newClaimTypeCell = new TableCell();
    newClaimTypeCell.Text = claim.ClaimType;
 
    newClaimValueCell = new TableCell();
    newClaimValueCell.Text = claim.Value;
 
    newRow.Cells.Add(newClaimTypeCell);
    newRow.Cells.Add(newClaimValueCell);
 
    claimsTable.Rows.Add(newRow);
}
 
divClaims.Controls.Add(claimsTable);
and now when you run the page it will be shown like
Now you can see that it is very easy to read the claims and this can be used in further processing.