Wednesday 2 September 2015

Create a report or a scorecard (SharePoint Server 2013)

By using SharePoint Server 2013, you can create, share, or access a variety of reports, scorecards, and dashboards that are stored in a central location, such as a Business Intelligence Center site.
NOTE   The information in this article applies to on-premises environments. It does not pertain to Office 365. If you're looking for information about BI in Office 365, see Business intelligence capabilities in Excel and Office 365 .

How do I create a report or a scorecard?

Depending on how your environment is configured, you can typically have a variety of tools available to create and publish business intelligence (BI) content. For example, you’ll typically have Excel Services and Visio Services available to use. You might also have PerformancePoint Services available to create, publish, and share reports, scorecards, and dashboards in your organization.
To create a report or a scorecard, you would typically take the following steps:
  1. Determine what information you want to show in the report or scorecard.
  2. Identify the data sources that you want to use. Make sure that you (and those who will be using the report or scorecard) will have access to the data.
    You might want to contact a SharePoint administrator for help with data sources and user permissions.
  3. Choose the report creation tool that you want to use.
    You can choose from a variety of tools, including Excel, PerformancePoint Dashboard Designer, Visio, and more.
  4. Create the report, and save it to a site such as a Business Intelligence Center site.
    See What is a Business Intelligence Center? for more information.

What tools can I use to create reports?

You can choose from a variety of tools to create reports, scorecards, and dashboards that you can publish to a SharePoint site.
Application
Capabilities

Excel and Excel Services
Excel 2013 makes it easier than ever to create reports, scorecards, and dashboards. You can connect to a wide variety of data sources and then create a variety of charts and tables. You can add filters, such as slicers and timeline controls to worksheets, and use features such as Quick Explore to see additional information about a particular value in a report.
If Excel Services is configured in your environment, then you can publish workbooks that can be displayed in a browser window. Depending on the data sources that are used, people can refresh the data to view the most current information.

PowerPivot
PowerPivot in Excel enables you to create large, multi-table data models that can have complex relationships and hierarchies.

Power View
Power View in Excel enables you to create mash-ups and presentation-ready, interactive dashboards. Power View views use tabular data sources, such as a Data Model that you can create in Excel.

PerformancePoint Dashboard Designer
If your organization is using SharePoint Server 2013 on premises, then you might have PerformancePoint Services configured and available for you to use.
PerformancePoint Dashboard Designer enables you to create dashboards that bring together a variety of reports, including PerformancePoint scorecards and reports, Excel Services reports, and SQL Server Reporting Services reports, in a single location. You can create powerful scorecards that contain advanced key performance indicators (KPIs) and add dashboard filters that can reused across multiple pages in a dashboard and across multiple dashboards.

Visio and Visio Services
Visio makes it easy to create data-connected diagrams, such as network infrastructure diagrams, organization charts, floor plans, and so on.
If Visio Services is configured, then you can publish Visio drawings to SharePoint Server where they can be shared in a central location such as a Business Intelligence Center site.

SQL Server Reporting Services
Reporting Services makes it possible to create and share a wide range of powerful reports, including interactive maps, bubble charts, gauges, tables, and other views. Reporting Services report creation tools include Power View (launched from SharePoint Server), Report Designer, and Report Builder.

Business Intelligence for SharePoint Online

BI capabilities in Power BI for Office 365, Excel, and SharePoint Online

NOTE    The information in this article applies to Excel 2013 and SharePoint Online in Office 365 Enterprise.  Business intelligence capabilities are not supported in Office 365 operated by 21Vianet.
Excel, SharePoint, and Power BI
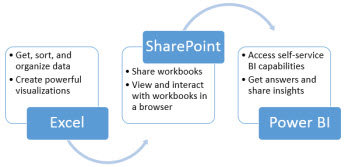
Business intelligence (BI) is essentially the set of tools and processes that people use to gather data, turn it into meaningful information, and then make better decisions. In Office 365 Enterprise, you have BI capabilities available in Excel, SharePoint Online, and Power BI for Office 365. These services enable you to gather data, visualize data, and share information with people in your organization across multiple devices.

What do you want to do?


Use Excel to gather and visualize data


Step 1: Get data


Step 2: Visualize data


Step 3: Add filters


Step 4: Add advanced analytic capabilities

Use SharePoint Online to share and view workbooks


Use Power BI for Office 365 to access more BI capabilities in the cloud


Learn more about BI in Office and SharePoint

Use Excel to gather and visualize data

In just a few simple steps, you can create charts and tables in Excel.
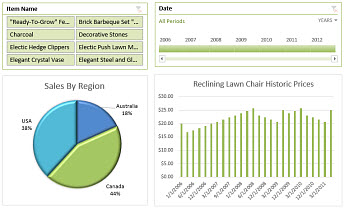
Example of an Excel Services dashboard

Step 1: Get data

In Excel, you have lots of options to get and organize data:
  • You can connect to a variety of data sources in Excel and use it to create charts, tables, and reports.
  • Using Power Query, you can discover and combine data from different sources, and shape the data to suit your needs.
  • You can create a Data Model in Excel that contains one or more tables of data from a variety of data sources. If you bring in two or more tables from different databases, you can create relationships between tables by using Power Pivot.
  • In a table of data, you can use Flash Fill to format columns to display a particular way.
  • And, if you’re an advanced user, you can set up calculated items in Excel.

Step 2: Visualize data

Once you have data in Excel, you can easily create reports:
  • You can use Quick Analysis to select data and instantly see different ways to visualize that data.
  • You can create lots of charts that include tables, line charts, bar charts, radar charts, and so on.
  • You can create PivotTables and drill into data by using Quick Explore. You can also use the Field List for a report to determine what information to display.
  • You can create scorecards that use conditional formatting and Key Performance Indicators (KPIs) in Power Pivotto show at a glance whether performance is on or off target for one or more metrics.
  • You can create compelling, interactive visualizations using Power View.
  • You can create interactive maps using Power View, or you can use Power Map to analyze and map data on a three-dimensional (3D) globe.

Step 3: Add filters

You can add filters, such as slicers and timeline controls to worksheets to make it easier to focus on more specific information.

Step 4: Add advanced analytic capabilities

When you’re ready, you can add more advanced capabilities to your workbooks. For example, you can createcalculated items in Excel. These include:
  • Calculated Measures and Members for PivotChart or PivotTable reports
  • Calculated Fields for data models

Use SharePoint Online to share and view workbooks

If your organization is using team sites, you’re using SharePoint Online, which gives you lots of options to share workbooks. You can specify Browser View Options that determine how your workbook will be displayed.
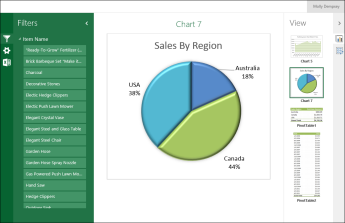
You can display workbooks in gallery view like this, where one item at a time is featured in the center of the screen:
Sample workbook displayed in gallery view
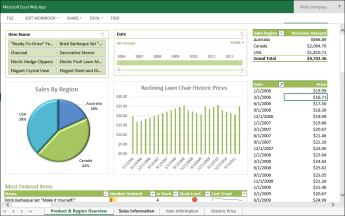
You can display workbooks in worksheet view, like this, where a whole worksheet is displayed in the browser:
Sample workbook displayed in worksheet view
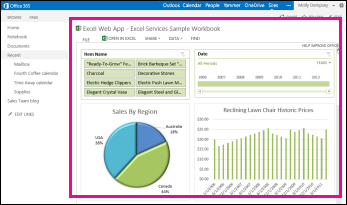
And, you can even display an item or a worksheet in a special container that is called the Excel Web Access Web Part, like this:
Sample workbook displayed in an Excel Web Access Web Part
When a workbook has been uploaded to a library in SharePoint Online, you and others can easily view and interact with the workbook in a browser window.

Use Power BI for Office 365 to access more BI capabilities in the cloud

Power BI for Office 365 gives you even more BI capabilities than what you get in Excel and SharePoint Online. Power BI for Office 365 provides you with a robust, self-service BI solution in the cloud.
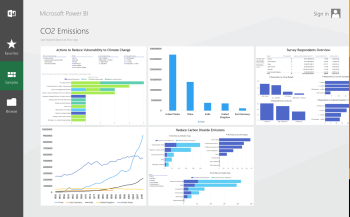
Power BI mobile app home page
Key features include:
  • Support for larger workbooks. Power BI for Office 365 can support workbooks up to 250 MB, provided the workbooks are configured a certain way.
  • Power BI Q&A, which enables you to ask questions and get answers using natural language queries.
  • Power BI sites on Power BI for Office 365, which enables you to transform a basic SharePoint site into a visual, dynamic way to view and share Excel workbooks with others. Workbooks are displayed in thumbnail images so it’s easy for people to see and select the workbooks they want to use.
  • Power BI Windows Store app, which is an application that is available in the Windows Store. You can use Power BI app to view and interact with Excel workbooks on a Windows tablet.
These are just some of the powerful new BI capabilities that are available in Power BI for Office 365. For more information, see Power BI for Office 365.