Friday 30 October 2015

What is Application Pool in IIS

Introduction to Application Pool
Application Pools are logical groupings of web applications that will execute in a common process, thereby allowing greater granularity of which programs are grouped together in a single process. For instance, if you wanted every Web Application to execute in a separate process, you simply create an Application Pool for each application. The Application Pool is the heart of a website. Application Pools enable us to isolate our Web Application for better security, reliability and availability. The worker process serves as the process boundary that separates each Application Pool so that when a worker process or application is having an issue or recycles, other applications or worker processes are not affected.

Application Pool

The maximum number of Application Pools that is supported by IIS is 2000. 

Introduction to Web Garden
An Application Pool with multiple worker processes is called a Web Garden. Many worker processes with the same Application Pool can sometimes provide better throughput performance and application response time.

IIS

A Web Garden is a site configured to run within multiple processes on a single server. You can still have multiple servers configured in a web farm, but the Web Garden reflects the configuration of a specific individual server. Now I am explaining how to deploy a Web Site on IIS.

How to Deploy site on IIS
I had generated my code and before deploying on IIS it is running in the browser like this:

local host

And I will deploy on IIS. There are 2 ways:
  1. Within the Visual Studio
  2. From IIS itself
1. Within the Visual Studio

Step 1:
 Go to Solution Explorer and select Web Application < Properties.

Properties

Step 2: Go to the Web tab and provide the name of the virtual directory.

virtual directory

After clicking it will show the message.

message

Output: Now the URL will change.

Output

Open IIS within the run window and type inetmgr.

inetmgr

2. From IIS itself
Now delete the previous application from the IIS.

delete the previous application

Step 1: Now go to the Default Web Site then Add Application and here provide the alias name and select the Application Pool name and provide the physical path of the Web Application.

path of the web application

access this web application

Now, I can still access this Web Application with the same name.

web application with the same name

All the applications present in the Application Pool can be in the same Application Pool or may be in a different Application Pool.

How to create an Application Pool
To create an Application Pool click on Application Pools < Add Application Pool.

Add Application Pool

Provide the name of Application Pool and select the version of the .Net Framework and click OK.

add application

There are 0 applications and each Application Pool has its own worker process.

Application Pool identity
The identity of an Application Pool is the name of the service account under where the Application Pool's worker process runs and it depends on the identity setting of the Application Pool.

Now go to Application Pool and right-click on Advanced Settings.

Advanced Settings

Click on the ApplicationPoolIdentity and here there is built- in account and they have a different property for security purposes and by default it is the ApplicationPoolIdentity account in IIS 7.

application poolidentity

We can set the Custom account also by giving the user name and password.

set connection

Now, I am explaining Application Pool identities:
Built-in user account: This are the 4 types of built-in user accounts.
  1. Local System: It is part of the Administrators group on the Web server. It is a completely trusted account and has very high privileges and can also access network resources.
  2. Network Service: This is the Restricted or limited service account that is generally used to run and this account provides the most security against an attack that might try to take over the web server.
  3. Local Services: It's the same as network services and it does not access network resources.
  4. ApplicationPoolidentity: Starting with IIS 7, Application Pools can be ran as the "ApplicationPoolIdentity" account. This is a dedicated pseudo user account for the working process of an Application Pool and is the recommended pool identity.
Custom user account
  1. Installed user account: You can configure an installed User Account under which you want the worker process to run.
  2. Property-based user: You can dynamically choose a username and a password under which you want the 
    worker process to run.
  3. Password property: The password is stored inside a property.
  4. Predefined password: By selecting this option you can define your own password.
A custom account is useful in the following situations:
  1. Want more security.
  2. When you are hosting web sites for multiple customers on a single web server. If you use the same process account for multiple customers, the source code from one customer's application may be able to access source code from another customer's application. In this case, you should also configure a custom account for the anonymous user account.
  3. When an application requires rights or permissions in addition to the default permissions for an Application Pool.
How to associate a Web Application with an Application Pool
Now go to Web Application < Manage Application < Advanced Settings.

manage application

And here select the Application Pool that you want and I have selected my own Application Pool "myappPool".

manage pool

Now here go to Application Pool and there is one Web Application.

Advantage of Application Pool
  1. If we deploy an application in one worker process and it is running and another Application Pool's Web Application is also running and if it has any other problem then it will not be affected by other Application Pool's Web Application.
  2. Deploying an applications to multiple Application Pools enable us to achieve the degree of application isolation that we need, in terms of availability and security.

REST Calls to SharePoint 2013 In a Console Application

REST interface exposes all of the SharePoint entities and operations that are accessible to clients written in othertechnologies. The added advantage of using REST is that you don't need to add references to any SharePoint 2013 libraries or client assemblies. Only using HTTP requests to the appropriate endpoints you can retrieve or update SharePoint objects. Now the next step is to understand what the security architecture of these REST calls is since the application that is obtaining SharePoint objects and data is not running in the context of SharePoint as shown in the diagram below.

REST calls in SharePoint

You need to pass the authentication and authorization details of the user to SharePoint and based on the user's security level that is set in SharePoint, the user will be allowed to only Read, Write and Delete objects and items. If Anonymous access is allowed on the SharePoint site then any user will be allowed read access.

Let's see a simple Console Application that will make REST calls to SharePoint 2013 and retrieve items in a list. Create a simple Console Application in Visual Studio. We will assume that we are passing the identity of the logged in user and performing a NTLM authentication. For this we use the following lines of code.
string jsonRequest = "http://win-4f44sec6iug:34480/sites/ts/_api/web/lists";           
CredentialCache credCache = new CredentialCache();
credCache.Add(new Uri(jsonRequest), "NTLM",CredentialCache.DefaultNetworkCredentials);
We then build the request with the appropriate header as in the following:
HttpWebRequest spRequest =(HttpWebRequest)HttpWebRequest.);spRequest.Credentials = credCache;
spRequest.UserAgent =
"Mozilla/4.0+(compatible;+MSIE+5.01;+Windows+NT+5.0";
spRequest.Method = 
"GET";spRequest.Accept = "application/json; odata=verbose";
We are using the GET verb to indicate that we are expecting a result back and passing in "Accept - Application/JSON" that indicates we want data returned in JSON format.
That's it. Then we write code to execute this web request
HttpWebResponse endpointResponse =    (HttpWebResponse)spRequest.GetResponse();
Now, put a breakpoint just after this line and start Fiddler. In the Text View you will see results, something as in the following.

Fiddler TextView

Click on the JSON tab, you will see results something as in the following. The results are wrapped in an outer element called "d" for safety purposes.

Fiddler Json View

Ok, so we get the JSON response back in our console application. Now let's create a meaningful query. For example, I have a ProductList. I would like to see the items of the ProductList. So I build a query that will return only data that I need. You can paste this code in your console application and change the URL based on your SharePoint details.

string jsonRequest = "http://win-4f44sec6iug:34480/sites/ts/_api/web/Lists/getByTitle('ProductList')/items?$select=Title, Product_x0020_Description,Product_x0020_Image,Product_x0020_Rate";
string jsonRequest = "http://win-4f44sec6iug:34480/sites/ts/_api/web/Lists/getByTitle('ProductList')/items?$select=Title, Product_x0020_Description,Product_x0020_Image,Product_x0020_Rate";CredentialCache credCache = new CredentialCache();
credCache.Add(
new Uri(), "NTLM"CredentialCache.);            HttpWebRequest spRequest =
   (
HttpWebRequest)HttpWebRequest.);spRequest.Credentials = credCache;
spRequest.UserAgent = 
"Mozilla/4.0+(compatible;+MSIE+5.01;+Windows+NT+5.0";        
spRequest.Method = 
"GET";
spRequest.Accept = 
"application/json;odata=verbose";HttpWebResponse endpointResponse =
   (
HttpWebResponse)(
I now check in Fiddler; the results are now significantly narrowed down to the information that I need.

Fiddler View

Now, using this data returned from SharePoint 2013 in JSON format, you can proceed to use this data as required. To build the correct query string needs some practice. For example, you need to use the field names that are internal to SharePoint. Like for the 'Product Description' field I have used "Product_x0020_Description". To determine this you need to look at the XML of the URL in the web browser and see the node names that are displayed. 

There are other options, such as OAuth and JavaScript cross-domain libraries that can be used by apps making CSOM/REST calls to SharePoint. More on this later.

Social Features in SharePoint 2013

We are living in the era of instant news and instant information on "what is happening right now" and "what are you doing right now". Nearly all companies have a Facebook page interaction and mine social data from Twitter feeds and other social networking sites to get the customer perspective of their products and services. When building sites in SharePoint 2013, there are many out-of-box social features available, bringing familiar social experiences to the users.

My Sites in SharePoint 2013 have been improved to include new, modern experiences such as microblogging, which is the basis of the news feeds infrastructure that supports such things as hash tags and mentions and the ability to follow content, people, and other sites. My Sites are the gateway to the information you’re interested in and to the people that you want to interact with. The content that you store in your My Site is yours until you decide to share it and with whom to share it. 

Community Sites are new in SharePoint Server 2013. They provide a forum experience that enables people to discuss common interests. Community Sites provide features to organize discussions, moderate conversations and promote participation of members through incentives, such as reputation points, gifted badges, likes and best replies. These features help people share and locate knowledge through persistent, searchable information.

SharePoint Server 2013 can be effectively used by the enterprises bringing together information and people. Enterprises can do some of their key business needs, such as keeping employees up-to-date, breaking down silos, increasing reuse of information, documenting tacit knowledge, finding who knows what, making collaborative decisions and getting work done.

You can create gamification sites in SharePoint 2013 with these new features, creating engaging sites for the employees, customers increasing their level of participation. 

The social features in SharePoint 2013 can be summarised as follows:
  • Microblogging

    • Share content, links, and media
    • Follow people, sites, content, and conversations
  • Activity Feeds

    • Provides a view into recent activity related to content, links, media, and people
  • My Sites

    • Updated document library capabilities and consolidation of activity
    • Share personal documents easily and keep track of access
  • Communities

    • Community sites with self-service administration and moderation
    • Modern community features such as achievements and reputation
  • Discussions

    • Modern discussion boards
  • Blogs

    • Client application integration
    • Categories, comments, and moderation
  • Follow people as well as content (documents, sites, tags)
  • Keep up-to-date with activities of interest
  • Company Feeds
In SharePoint 2013, social networking emphasizes two areas/features, MySites and Communities. MySites is the point where you collect all of your personal productivity materials and Communities are where you gather group materials. It looks like they are sort of rolling blogs and wikis under Communities and PeopleSearch under MySites, while adding Microfeeds as an automated way to aggregate multiple sources of information.

Thursday 29 October 2015

Claim based Authentication Tutorial Part 4

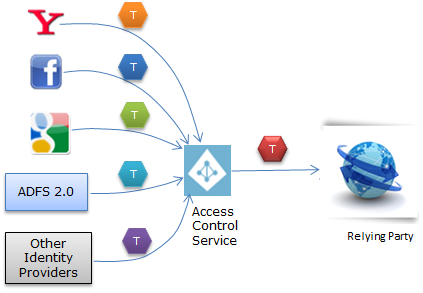
In federated scenario, two Identity Providers comes into the picture : one is Identity Provider (where user puts its credentials) and another is Federated Provider which understands all the Identity Providers and accordingly creates a new token that is understood by the relying party. Relying party does not care about Identity Providers, rather it just trust the Federated Provider and can understand the token issued by it. It can be pictorially depicted as
FullImage
As here in above image, we can see that every Identity Provider send different type of token. Access control service process these and create a new token and sends to Relying Party.
We can have our own custom Identity Provider and Federated provider as well.  In Microsoft stack, Access Control Service is one of the most popular service which serves the purpose of a federated provider. It is Pay-As-You-Go service on Azure and provides all the basic infrastructure and requires less or no amount of coding. Access Control Service is now called Windows Azure Active Directory.
In today’s post, I’ll create a step by step example to implement the Federated provider using Windows Azure Active Directory. First let me discuss the various components while using federated provider . So there would be at least  four components
  1. Client
  2. Identity Provider(s)
  3. Federated Provider
  4. Relying Party
As we have already discussed all the above components in my last post. we ‘ll create a step by step example of Federated Provider. Here Identity provider could be any third party Identity Provider or our own Identity Provider. Windows Azure Active Directory works as Federated Provider and a application hosted on my local machine will be relying party.
Let’s go step by step. First we need to create a namespace at azure Access control. For this first one need to be registered on http://windows.azure.com. If you have account here then you can continue else you’ll require to register here before proceed.
Here we’ll login azure portal (https://windows.azure.com/) and create a Active Directory Access Control namespacefor our Federated Provider that will be used by our application (Relying Party). After login it redirects to home page and provides many options in left pane of the Home page as
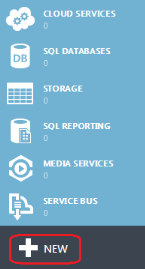
OneNew
Here to quickly create the Active Directory Access Control namespace click on the encircled new button in left bottom as in above screen shot. It opens up a window.
Select App Service ->Access Control -> Quick Create. It asks for namespace and region. The namespace should be globally unique, else it will not be accepted. After filling it click on Create
four
I have given here namespace CBAPart4 and selected region Southeast Asia. Here you can see encircled green tick mark which means the namespace available. After creating, it will be enlisted in your account with status active few minutes as:
five
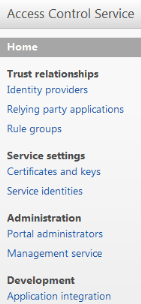
On this page, click on Manage button at bottom middle of the page which takes us at different page in a new tab/window with left pane as
six
Now click on Identity Providers which allows to add Identity providers for this Federated Provider. It takes us at below screen
seven
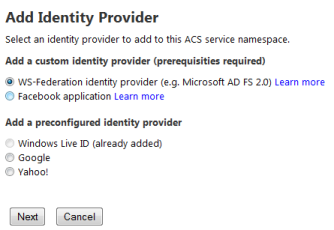
It has added by default added Windows Live Id as an Identity Provider. We can add other providers by click on Add link encircled in the above screen shot.
eight
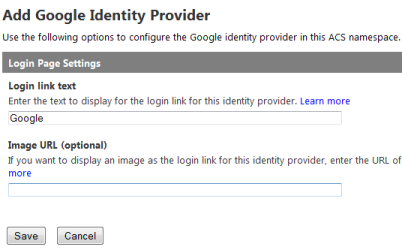
Here we have some already pre-configured Identity Providers like Google, Yahoo and custom Identity Providers like facebook, ADFS 2.0 (Active Directory Federation Services).  Let’s add Google here
nine
It asks the that display and any image for that if we want to show that at login link. I provided an image and Clicked on save. Similarly we can add Yahoo as an Identity provider. Now we have three Identity providers for our federation provider: Google, Yahoo and Windows Live Id.
Next we require to add the Relying Party. Means our application that will be authenticated via this Federated Provider. To add the Relying Party applications, click on Relying Party applications link, it takes us
AddRP1
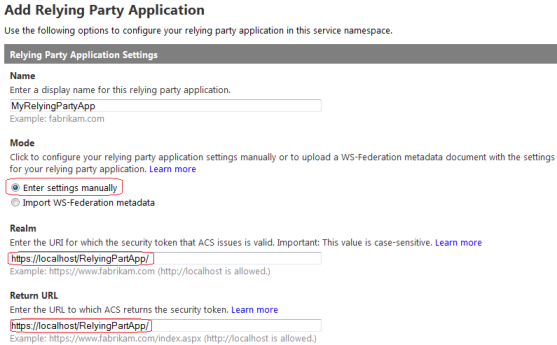
Here I provided the name to my Application as MyRelyingPartyApp . There are two ways to add settings. Select the first one (Enter settings manually) as encircled in mode section. We need to provide two URLs. Here one is for which the token is issued (also called Realm) and another where the federation provider returns the access token. Leave the rest of the settings of section Relying Party Application Settings section and move to next sectionAuthentication settings on the same page as
AddRP_2
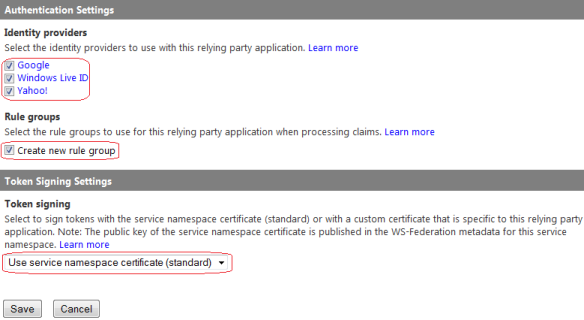
Here it lists all the Identity Providers that we added , we need to select all which we want to use. I selected all. Now we need to create the rules. So first require to create a Rule Group then rules under that rule group.  We either can use any existing rule group (if exists which can serve the purpose) or can create a new one. I’ll be telling why do we require the rules in coming section.
Token is required to be signed to check the integrity at the target application. Here I have selected the default option for this demo. We can provide our own certificate that can be used for token signing.
Rule – Rules are very important here. Identity Providers sends token with claims to Federated Provider. As Federated provider trust Identity Provider so it knows the format and details about token and can read it. Federated provider first checks the integrity of token then read the required data and creates a new token with claims. Then Federated provider sends this token to Relying party. Here this rule is to convert the claim provided by Federated Provider to some other claim type that can be understood by Relying party.  We can easily pass through the same just creating a rule with pass through.
Rules also are very helpful because we not want to sends all the claims to Relying party or want to combine some claims. These scenarios is handled by these rules.
To add the rules, click on the Rule Groups from left pane
RuleGroup1
It adds  by default a rule group for added Relying party. We can create new one . We need to add the rules in the rule group assigned to Relying party. For that click on Default rule group on the above screen shot and it redirects us to
RuleGroup2
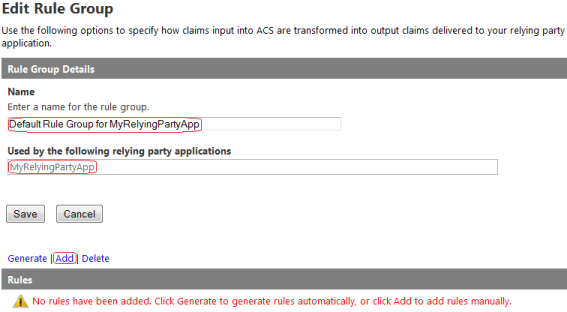
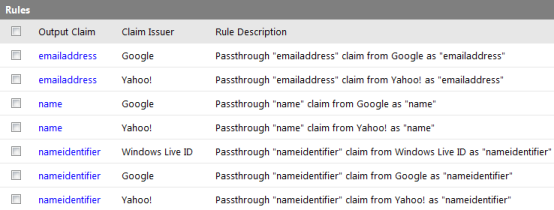
Here we can see the details of the rule group. It is for the Relying party that we added as second encircled . Now in this group there is no rule. Either we can add some rules or we can simply check on Generate button, which redirects us a page which list down all the Identity Providers for this Federated Provider namespace and again click on generate button which just add the default claim rules that just pass the claims returned by Federated Provider as is. A rule is created is for each claim which has input claim and output claim as
Claims
Else we can create rule by our self by clicking on the Add link as encircled in the previous screenshot as:
AddClaimNew
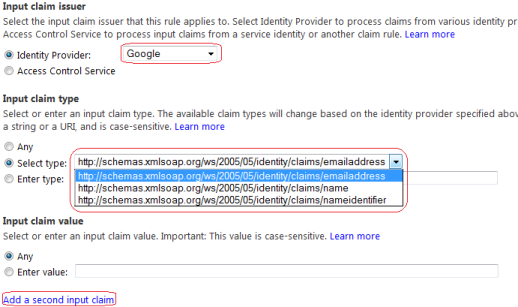
It has three section, first section If  first option Identity provider, once we select it accordingly it populates all the claims provided. As I selected Google and enlist all the claims by provided by Google in dropdown as marked in second encircled area.  We can add here another input claim as last encircled link. Now let’s move to next section that is Then
AddClaim2
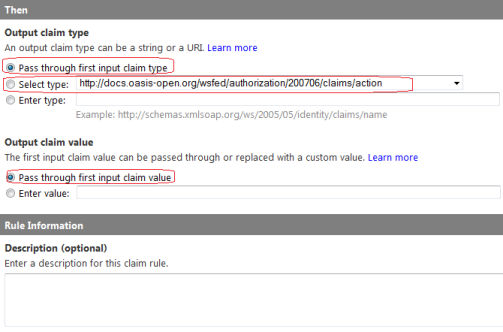
Here either we can pass through as it is or we can send it in some another type that is available in second encircled drop-down. It has a list of standard claims that we can choose off. Also we can put our own custom claim type in the text box. Every claim type is in URI format as per standard so custom type also should follow the standard. I have selected pass through. The last section is Rule Information . here we can put the details about the rules.
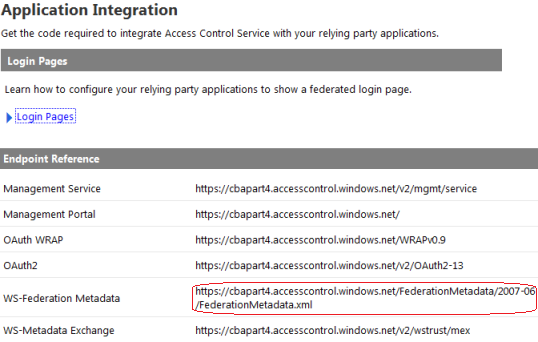
All the required steps has been completed on windows azure portal, Now need to get the metadata for the Federated provider. Click on the Application Integration link under the Development section in left pane.
AppIntegration
As this provides many option but we require here WS federation metadata as encircled that will be used in relying party . Copy that encircled URI.
As discussed, I have created a ASP.NET web application project using default template and hosted at IIS. Now the next step to build a trust relationship with Relying party and Federated Provider. So as we have already seen in our part 2 post that how to build relationship between Identity Provider and relying party. We require here the federation metadata from the identity provider and add the STS (Securty Token Service) reference. I am adding those steps for the completeness of the post.
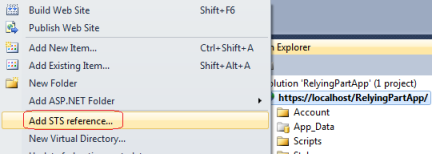
So let us add the STS reference as
AddSTSReference1
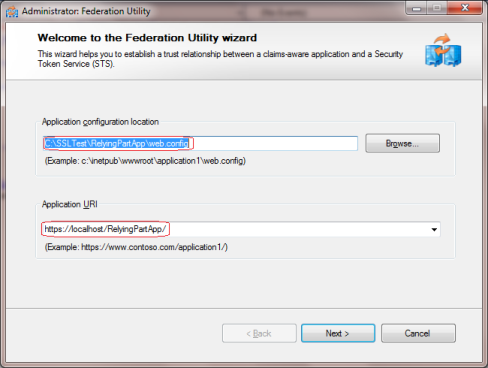
It opens a popup as
addsts2
First encircled area contains Relying party configuration settings and another is Application URI. Click on next
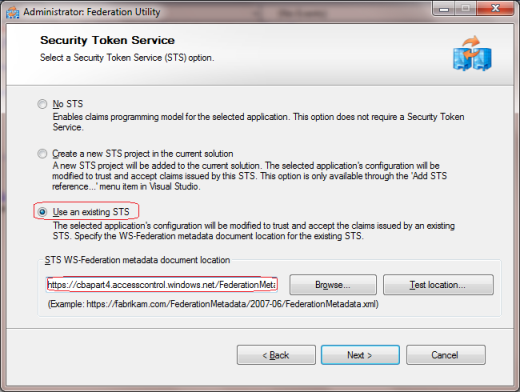
AddSTS3
Here as we are using existing STS so selected the last one. We require to provide the metadata here so to get the metadata URL from Federated Provider. I have the provided the metadata URI that we copied from Application Integration section. Click on next
AddSTS4
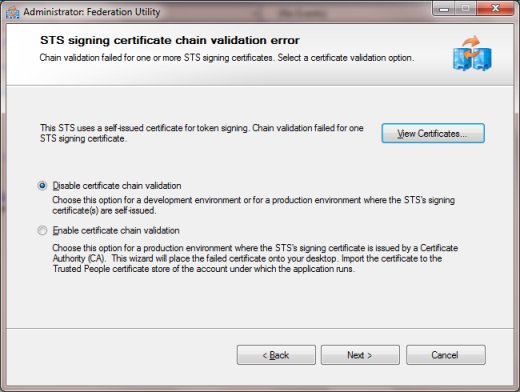
Here I have selected to Disable certificate chain validation as my certificate is not verified. For development purpose it can be disabled but at production, this option should not be selected.  Click Next
addsts5
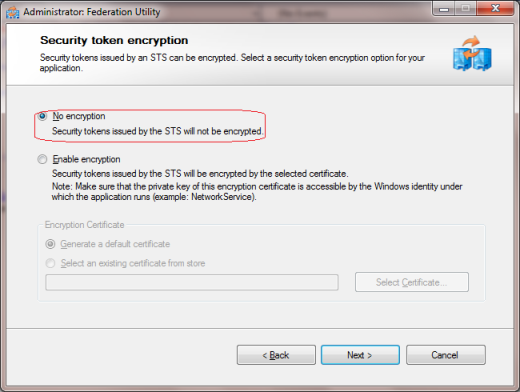
Select No Encryption. Click Next.
AddSTS7
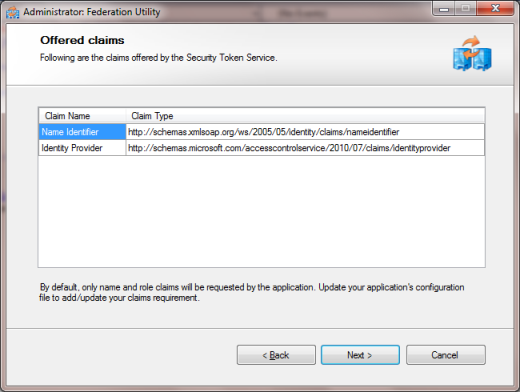
Here we have two claims Name and Identity Provider. Click Next
AddSTS8
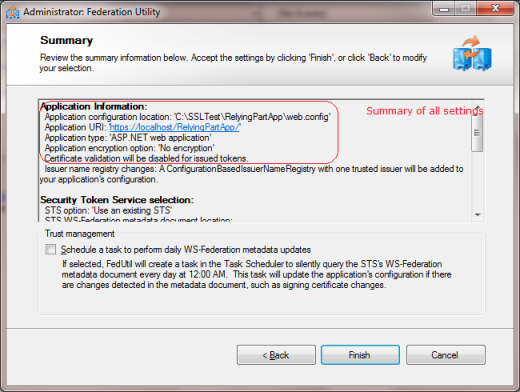
Now click finish. And we have built a trust relationship between federated provider and our own Application (Relying Party).
Now it’s time to run the application. So let us run it
RunRP1
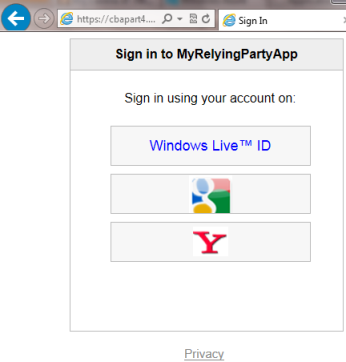
It takes us a page and asks us to choose the Identity Providers that we added as Identity Provider while configuring Federated Provider on Azure Portal. The images for Identity Providers, I provided while adding these on Azure Portal.
Now I clicked on Google and it took me at Google login page after providing my credentials and successful authentication, I got redirected my own application as an authenticated user. Similarly can get authenticated via Windows Live Id or Yahoo Id.
Reading Claims provided by Identity Providers
Reading the claims is very easily that are provided by these Identity Providers. I read the claims and displayed it via a Data Control. To read the claims, we can use the following code
IDictionary<string, string> claims = new Dictionary<string, string>();
// Cast the Thread.CurrentPrincipal
IClaimsPrincipal icp = Thread.CurrentPrincipal as IClaimsPrincipal;
// Access IClaimsIdentity which contains claims
IClaimsIdentity claimsIdentity = (IClaimsIdentity)icp.Identity;
gdViewClaims.DataSource = claimsIdentity.Claims;
gdViewClaims.DataBind();
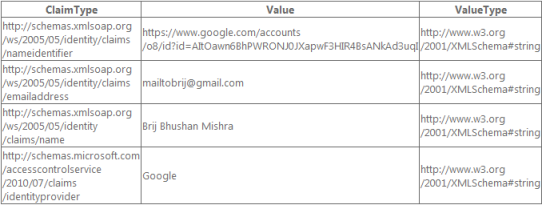
Now If I login through Google account then it shows the following claims
GoogleClaims
I have displayed three values here ClaimTypeValue, and ValueType.  Here Google returned four Claims which has it’s descriptions and my mail-id and name. Similarly if I login through another Identity Providers, they will show different claims. We can use these values in our relying party for different purposes.