Monday 29 February 2016

SharePoint 2010 – Create a Site Definition Using Visual Studio Steb by Step for beginners

What is Site Definition?

Site Definition consists of XML and ASPX pages stored in the 14 Hive folder. You can locate them in the following folder:
C:\Program Files\Common Files\Microsoft Shared\Web Server
   Extensions\14\TEMPLATE\SiteTemplates
(Please note to use your front end server machine and installation drive letter.)

Inside the Folder

You can see n number of folders inside SiteTemplates.
Some of the folders which we interact with are:
  • MPS – Meeting Workspace
  • Blog – Blog Site

Why we need Site Definitions instead of Web Templates?

The user can create customized web templates. This will create the modified page inside the database and thus creates performance issues. So Site Definitions provide a better alternative in case there is multiple reuse of the instance.

Creating the Site Definition from Visual Studio 2010

Open Visual Studio in Elevated Permissions mode and use File > New Project > SharePoint > Site Definition.
(You need to install http://sharepointdevtools.codeplex.com/ to get the above template.)
Once the site definition project is created, add a new Visual Web Part into it. Our idea is to list the current Tasks in progress.
Add the following code into the web part load event:
protected void Page_Load(object sender, EventArgs e)
{
    using (SPSite site = new SPSite(SPContext.Current.Site.Url))
    {
        using (SPWeb web = site.OpenWeb())
        {
            // Get data from a list.
            string listUrl = SPContext.Current.Site.Url + "/lists/tasks";
            SPList list = web.GetList(listUrl);
            SPView view = list.Views["All Tasks"];
            SPListItemCollection items = list.GetItems(view);
            foreach (SPListItem info in items)
                if (info["Status"].ToString() == "In Progress")
                {
                    this.Controls.Add(new Label() { Text = "Title: " + 
                         info.Title, ForeColor = System.Drawing.Color.Navy });
                    this.Controls.Add(new LiteralControl("<br/><br/>"));
                }
        }
    }
}
Now we need to specify the Visual Web Part in the Default.aspx of the site definition file.
Add the following lines in the SiteDefinition > default.aspx file.
<%@ Register  TagPrefix="MyWebPartControls" Namespace="SiteDefinitionProject1.VisualWebPart1" 
              Assembly="$SharePoint.Project.AssemblyFullName$" %>
<MyWebPartControls:VisualWebPart1 runat="Server" />
You can see the attached source code for a detailed analysis. Now we are ready with the site definition project which lists the current tasks that are In Progress.

Deploying the Site Definition to SharePoint

For deploying the site definition, you can right click on the project and select Deploy. The project gets deployed to the SharePoint site selected while project creation.
Wait for a few seconds to see the succeeded message.

Creating the Demo Data

Before proceeding with the next step, I recommend you to create a Tasks list with some tasks In Progress. This list will be used by our site definition project.

Accessing the New Site Definition

Inside SharePoint, use the Site Actions > New Site menu item.
In the appearing dialog, you can see the new site definition which we created.
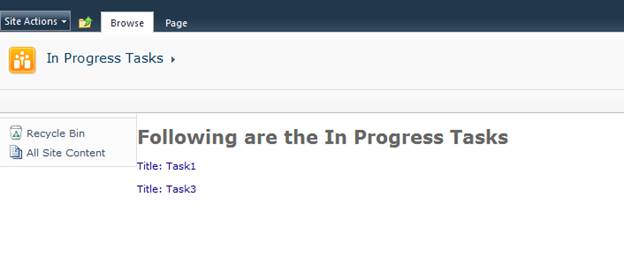
Select the Item, enter a Title, URL, and click the Create button. You will see the following page with the In Progress tasks listed.
So this concludes our site definition creation using Visual Studio. This article explores the basics of site definition.  In real world scenarios, we can use a site definition to manipulate other lists or libraries.

Thursday 25 February 2016

How to Write sharepoint metadata (Version) of document in word document


Let us discuss the topic on sharepoint metadata that is associated with word document in sharepoint. In few requirements, client may need to see the sharepoint metadata in the document downloaded from sharepoint document library.

1. Go to document library and library setting.

2. Click Advance setting to enable content approval is equal to yes

3. Click Document under Content type


 clip_image002


4. Click information policy setting and select check box Enable Lables
clip_image004
- See more at: http://www.sharepointpals.com/post/How-to-embed-sharepoint-metadata-(Version)-of-document-in-word-document#sthash.Mn7XZIxy.dpuf
4. Click information policy setting and select check box Enable Lables

5. Define a label in the label format as Version:{Version}\n - 


  clip_image006


6. Go to Document library and click Open with explorer in the Connect & Export section in the library menu -

clip_image014
7. Open the  document and select Quick part in Insert menu

8. Select label in the document property

clip_image012

9. The version:{Version}\n will be appeared In the word document and click to save

10. Go to document library and select new document template and update your content, then save it in the document library

11. Go to library setting and click modify view to add the label column in the view and see the version number of the document uploaded in the library


12. Download the copy of the document and see the version number where you have placed the label in the template document.


6. Go to Document library and click Open with explorer in the Connect & Export section in the library menu
clip_image008
7. Open the template.dotx document and select Quick part in Insert menu
clip_image010
8. Select label in the document propertyclip_image012
9. The version:{Version}\n will be appeared In the word document and click to save
10. Go to document library and select new document template and update your content, then save it in the document library
clip_image014
11. Go to library setting and click modify view to add the label column in the view and see the version number of the document uploaded in the library
clip_image016
clip_image018
clip_image019
12. Download the copy of the document and see the version number where you have placed the label in the template document.
clip_image020
- See more at: http://www.sharepointpals.com/post/How-to-embed-sharepoint-metadata-(Version)-of-document-in-word-document#sthash.Mn7XZIxy.dpuf


clip_image002
4. Click information policy setting and select check box Enable Lables
clip_image004
- See more at: http://www.sharepointpals.com/post/How-to-embed-sharepoint-metadata-(Version)-of-document-in-word-document#sthash.Mn7XZIxy.dpuf


Le                             


t us discuss the topic on sharepoint metadata that is associated with word document in sharepoint. In few requirements, client may need to see the sharepoint metadata in the document downloaded from sharepoint document library.
1. Go to document library and library setting.
2. Click Advance setting to enable content approval is equal to yes
3. Click Document under Content type
clip_image002
- See more at: http://www.sharepointpals.com/post/How-to-embed-sharepoint-metadata-(Version)-of-document-in-word-document#sthash.Mn7XZIxy.dpuf
Let us discuss the topic on sharepoint metadata that is associated with word document in sharepoint. In few requirements, client may need to see the sharepoint metadata in the document downloaded from sharepoint document library.
1. Go to document library and library setting.
2. Click Advance setting to enable content approval is equal to yes
3. Click Document under Content type
clip_image002
4. Click information policy setting and select check box Enable Lables
clip_image004
5. Define a label in the label format as Version:{Version}\n
clip_image006
6. Go to Document library and click Open with explorer in the Connect & Export section in the library menu
clip_image008
7. Open the template.dotx document and select Quick part in Insert menu
clip_image010
8. Select label in the document propertyclip_image012
9. The version:{Version}\n will be appeared In the word document and click to save
10. Go to document library and select new document template and update your content, then save it in the document library
clip_image014
11. Go to library setting and click modify view to add the label column in the view and see the version number of the document uploaded in the library
clip_image016
clip_image018
clip_image019
12. Download the copy of the document and see the version number where you have placed the label in the template document.
clip_image020
- See more at: http://www.sharepointpals.com/post/How-to-embed-sharepoint-metadata-(Version)-of-document-in-word-document#sthash.Mn7XZIxy.dpuf

Wednesday 24 February 2016

Event Handlers in SharePoint

In SharePoint you can add event handlers to the different lists, document libraries and content types within a SharePoint site. Event handlers are defined in custom .NET assemblies. You can define event handlers for the different operations on list items, like adding a list item, updating a list item or deleting a list item.

Event handlers need to be registered and can best be installed and registered through the SharePoint feature framework.

Synchronous and Asynchronous Events


There are synchronous and asynchronous events. Events ending by –ing are synchronous events: ItemAdding, ItemUpdating, ItemDeleting. Event handlers defined for these events are executed before the operation is executed on the content database. Asynchronous events are the events that end by –ed: ItemAdded, ItemUpdated, ItemDeleted. Event handlers for these events are executed after the operation is occurs in the content database.

Base Classes

There are different base classes from which you can inherit when developing event handlers. The decision from which class you are going to inherit depends on what you want to achieve with your event handler:

     SPItemEventReceiver: inherit from this class if you want your event handler to be executed when a list item is added, updated or deleted.
     SPListEventReceiver: inherit from this class if you want your event handler to be executed when the structure of your list is modified or when a content type is added or removed from the list.
     SPFeatureEventReceiver: you can add an event handlers to a feature events like activation and deactivation, installation and deinstallation.
     SPEmailEventReceiver: you can also develop an event handler for emails that are sent to a SharePoint list.
     SPWebEventReceiver: you can also handle events that occur when a site is added to or removed from a site collection.

Updating the list item

There are 3 methods to update a list item:

    Update: With this method you can update the list item. But it also changes the Modified By column (internal name Editor) to the SHAREPOINT\system account and sets the Modified column to the current date time. If versioning is enabled, the version is increased.
    SystemUpdate: This method also updates the list item but preserves the values in the Modified By column (internal name Editor) and the Modified column. This method comes with two overloads. You can also specify a boolean value to indicate if you want to increase the version number or not.

systemupdate


·         UpdateOverwriteVersion: This method updates the list item without changing the version number. It also allows to modifiy the values in the system columns lik Created By (internal name Author), Modified By (internal name Editor), Modified and Created.
Disabling and Enabling the event handler

To avoid that a list item event handler is triggered again and again and again, you have to prevent the event handler from firing before you update changes to the list item. You can achieve this by executing the DisableEventFiring method on the list item. After the changes are saved you can activate the event handler again by executing the EnableEventFiring method on the list item.

Best practice is to execute the DisableEventFiring method right before any of the update methods and to execute the EnableEventFiring method right after one of the update methods.
AllowUnsafeUpdate

AllowUnsafeUpdate is a property on the SPSite and SPWeb objects. You can set it to true to avoid security validation before the changes are written to the content database. There is an excellent and very detailed post about this property.
RunWithElevatedPermissions

You will find a lot of code snippets wrapped in a RunWithElevatedPermissions construct. This is necessary if you will be changing data that is not accessible by some types of users. For example if you need to update a column or another list when a document or list item is read, this will cause en error when the user has only read access to this list or the other list. In that case you can wrap your update code in the following construct:

SPSecurity.RunWithElevatedPrivileges(delegate()
{
    using (SPWeb web = properties.OpenWeb())
    {

      // web will be based on the rights for the system account
     // here follows your event handler code

    }

});

What is reflection in C# ?

Reflection is the ability of a managed code to read its own metadata for the purpose of finding assemblies, modules and type information at runtime. In other words, reflection provides objects that encapsulate assemblies, modules and types. A program reflects on itself by extracting metadata from its assembly and using that metadata either to inform the user or to modify its own behavior. Reflection is similar to C++ RTTI (Runtime Type Information), but much broader in scope and capability. By using Reflection in C#, one is able to find out details of an object, method, and create objects and invoke methods at runtime. The System.Reflection namespace contains classes and interfaces that provide a managed view of loaded types, methods, and fields, with the ability to dynamically create and invoke types. When writing a C# code that uses reflection, the coder can use the typeof operator to get the object's type or use the GetType() method to get the type of the current instance.

You can use reflection to dynamically create an instance of a type, bind the type to an existing object, or get the type from an existing object and invoke its methods or access its fields and properties. If you are using attributes in your code, Reflection enables you to access them.

Friday 5 February 2016

Limitations of SharePoint 2010 Sandboxed Solution

The sandboxed solution is one of the more promising new features in SharePoint 2010. With sandboxed solutions, developers can write solutions that can be easily deployed and executed in a shared hosting environment. This opens up a myriad of opportunities for SharePoint developers to bring solutions to the marketplace, and for lower privileged administrators to acquire and install third-party components. Before you jump right in and start developing sandboxed solutions, there are some limitations that you should consider.

Before you start ranting and raving about the information I am about to share, it is helpful to take a step back and consider why you would want to develop for the sandbox in the first place. If you want to relate a sandboxed solution to something outside of SharePoint, consider a WordPress module, iPhone application, or Facebook application. None of these platforms will allow solution providers to access sensitive information on or change the properties of the platform itself. They provide a specific function, usually self-contained and not reliant on any other application on the platform (unless their function is to enhance or extend an existing application). Sandboxed solutions should be thought of in the same regard. So what are the limitations?

Directly Accessing a Database

Sandboxed solutions cannot directly read from or write to a database on the server. This makes sense when you think about it. Most SharePoint shared hosting environments do not provide access to a database anyway. After all, much of the content you will want to work with in a sandboxed solution will be in SharePoint lists, and you have access to those. Sometimes, however, you may want to view and edit data from one of your core business systems. To access that data, you can use a “Hybrid Approach”. One such approach involves creating an external content type for the line of business data, then using the SPList API in the sandbox to work with that data. This is less of a workaround and more of a structured approach to working with external data in a sandboxed solution. What I am really saying is that ADO.NET cannot be used to directly access data from a sandboxed solution. While this may be a hurdle for traditional ASP.NET developers, it is not insurmountable.

Writing to the Disk


From a sandboxed solution, you cannot directly write to the disk of the application server. Again, you can write to SharePoint lists in a sandboxed solution, so this is hardly a show stopper. The primary reason one would want to write to the disk from a SharePoint solution, in my opinion, is to write to log files. You can use a full-trust proxy with the SharePoint Logger to write to the Windows Event Log and SharePoint Unified Logging Service (ULS) logs.
Accessing the Objects in another Site Collection

Since site collections are a common container for SharePoint deployments in a shared hosting environment, limiting access of a sandboxed solution to objects in the current site collection seems like a good thing. It is often beneficial to rollup content from multiple site collections in an on-premise installation. If you insist on using a sandboxed solution, workarounds will surface using hybrid approaches and so forth. However, you should consider using a farm solution for accessing other site collections for on-premise or dedicated hosting environments.

Writing Fully Coded Workflows

As you may know, there are two ways to create workflows for SharePoint 2010: using SharePoint Designer 2010 to create declarative workflows and using Visual Studio 2010 to develop custom workflows. The limitation is related to the latter. Consider that most of the reasons you would want to write a custom workflow are not possible in the sandbox anyways. For example, you do not have access in a Visual Studio 2010 sandboxed solution to the farm-level objects that are used to send emails, and sending emails is a common activity in workflows. SharePoint Designer 2010, on the other hand, was designed to create solutions using pre-defined tasks (such as sending emails) within the confines of the current site. As with the other limitations, there will be workarounds. In order to keep it simple, however, you should consider using declarative workflows in a sandbox and deploying coded workflows as a farm solution when environment allows for it.

Developing Visual Web Parts

I have included this as a limitation only to set the record straight. Visual Studio 2010, out of the box, does not allow you to use the visual editor to create Web Parts for a sandboxed solution. This caused quite the uproar initially since the visual Web Part was one of the most highly anticipated Visual Studio 2010 enhancements for SharePoint developers. Microsoft responded quickly with a Visual Studio 2010 Power Tool for SharePoint 2010 developers. In addition to allowing for visual editing of sandboxed Web Parts, this Power Tool provides some helpful compiler tips.